How-To: Make a Pinhole

Since we are almost a month away from Pinhole Photography Day. I'm gonna share a series of articles dedicated to the design and construction of pinhole cameras. I'll try to explain how to use Mr. Pinhole's website to design a camera, and I'll give some ideas to make a pinhole camera using things you might already have at home.
Disclaimer: I'll try to simplify everything as much as I can. No Math! In case somebody is interested in more specific content, I'll add the best resources I've found.
The first step is to make a pinhole or buy one, but I encourage everybody to make their own, considering how easy it is. I recommend using different pins or needles to get an idea of the different sizes you can create. Also, make a few. It takes practice to create a good pinhole (you can get at least 9 pieces from a single can.) Remember, Practice makes perfect! And your camera is only gonna be as good as your pinhole.
Safety considerations
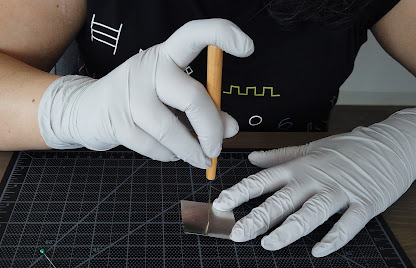
- Be careful. The aluminum square can easily cut your fingers. I recommend adding tape to the borders before making the pinhole, just as a safety measure.
- If you can't push your pin, you can use a cork as a handle like the one I have here.

Materials
- Soda/ beer can
- Sewing pin
- Scissors
- Tape
- Sandpaper ( I use 220 grit)
- Cork
- Self-healing cutting mat or something to protect the table.
Steps
- Cut the can into squares. They don't need to be in a specific size. I recommend at least 3cm x 3cm
- Make a hole in the center of the square applying even pressure and keeping the needle perpendicular to the table. Do not push hard. You want to use just the tip of the pin to get smaller pinholes.
- Carefully check the bottom of the square. You'll see/feel small pieces of aluminum on the border of the pinhole.

- Sand it until it feels smooth

- Repeat for all the squares you cut. If you haven't added tape yet, add tape to the borders of each square.

- Now to get the pinhole's size, I scan it and use photoshop. Don't forget to add tape to the border to avoid scratching your scanner. If you don't have a scanner, a photograph should work as well. The square should be as flat as it can be.

- Once you scan all of them, check which ones are good to use. In my case, only 3 are circular enough to create a photograph without distortion. (Don't expect perfect circles, but as close as a circle as you can get) Full-Size Image

- To check the size, open the file in Photoshop or any other program that gives you the size information in millimeters. Crop the image to the pinhole border and then check the image size in mm (Image->Image Size). That is your pinhole size. In this example, my pinhole is 0.28mm.

- Repeat for each pinhole, and don't forget to write the size in each square. You'll need the information later to decide which pinhole will work better for your camera and decide exposure times more accurately.
Congratulations! you have made your own pinhole.


Comments
Post a Comment